
January 2012
Building Forms with Entities in Symfony2
This walkthrough will demonstrate the process of building and validating a form in Symfony2 to save information in a database. It will guide you through the basic logic of handling a form within the Controller, as well rendering the form with Twig.
If you’re still following along from Part 1 - Mapping Entities, you should have your Entities created and your relationships properly mapped. If you’re just dropping in, our goal in this example is to create a Form that can add a User and sort them into a Group in the database.
We’ll begin by looking into the Form Type, and how Symfony can help us quickly and easily build forms by assuming the type of form element we need.
The Form
Let’s take a look at our AddUser Form Type.
<?php

namespace kurtfunai\WalkthroughBundle\Form;

use Symfony\Component\Form\AbstractType;
use Symfony\Component\Form\FormBuilder;

class AddUser extends AbstractType
{
    /**
     * Builds the AddUser form
     * @param  \Symfony\Component\Form\FormBuilder $builder
     * @param  array $options
     * @return void
     */
    public function buildForm(FormBuilder $builder, array $options)
    {
        $builder->add('firstName');
        $builder->add('lastName');
        $builder->add('middleName');
        $builder->add('group');
    }

    /**
     * Returns the default options/class for this form.
     * @param array $options
     * @return array The default options
     */
    public function getDefaultOptions(array $options)
    {
        return array(
            'data_class' => 'kurtfunai\WalkthroughBundle\Entity\User'
        );
    }

    /**
     * Mandatory in Symfony2
     * Gets the unique name of this form.
     * @return string
     */
    public function getName()
    {
        return 'add_user';
    }
}
Located In: WalkthroughBundle/Form/AddUser.php
View file on Github
The main function that we’re going to be looking at in this class is buildForm(). With this line: $builder->add('firstName'); we’re referring to the $firstName property on our User Entity. There are ways to specify the type of form element used, but based off the Doctrine variable type, Symfony will assume the type of form element to use. In this case, $firstName is defined as a varchar(255) in our Entity. Symfony will automatically create a text form element.
Even more interesting, $builder->add('group'); will automatically become a select list in our form, populated by the data in our Groups table. If you’ve read Part 1, you may remember me mentioning that I’d explain the __toString() override on our Group Entity. Here it is - to make sure that Symfony knew how to display the proper group names in our select list, we had to override the __toString() method on our Entity to return the $name.
Here is a preview of what the form will look like when finished:
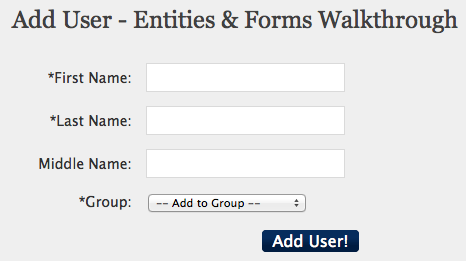
Pretty cool, right? Next up, validation! We’ll be covering the basics of adding validation constraints with custom error messages.
More information about how to specify different field types/options can be found here.
Validation
———-
Here you can see some validation for our User Entity. We’re ensuring that the first, last, and middle name cannot exceed 250 characters in length. We’re also making sure that our firstName, lastName, and group, must have a value.
kurtfunai\WalkthroughBundle\Entity\User:

  properties:

        firstName:

                    - MaxLength: {limit:250, message: "First name must be less than 250 characters."}

                    - NotBlank: {message: "Please enter a first name."}

        lastName:

                    - MaxLength: {limit:250, message: "Last name must be less than 250 characters."}

                    - NotBlank: {message: "Please enter a last name."}

        middleName:

                    - MaxLength: {limit:250, message: "Middle name must be less than 250 characters."}

        group:

                    - NotBlank: {message: "Please select a group."}
Located In: WalkthroughBundle/Resources/config/validation.yml
View file on Github
More information about Validation & Forms in Symfony2 can be found here.
The Controller
————–
Here is our UserController - Let’s take a quick look before we go into more detail below.
<?php

namespace kurtfunai\WalkthroughBundle\Controller;

use Symfony\Bundle\FrameworkBundle\Controller\Controller;
use kurtfunai\WalkthroughBundle\Entity as Entity;
use kurtfunai\WalkthroughBundle\Form as Form;


class UserController extends Controller
{
    /**
     * By default, displays form to add a User.
     * If form has been posted, validates and adds User to database.
     * @return \Symfony\Bundle\FrameworkBundle\Controller\Response
     */
    public function addAction()
    {
        $user = new Entity\User();
        $form = $this->get('form.factory')->create(new Form\AddUser(), $user);
        $request = $this->get('request');

        if ($request->getMethod() == 'POST')
        {
            $form->bindRequest($request);
            if ($form->isValid())
            {
                $em = $this->get('doctrine')->getEntityManager();
                $user->setDateAdded(new \DateTime());
                $em->persist($user);
                $em->flush();
                $this->get('session')->setFlash('notice', 'You have successfully added '
                        .$user->getFirstName().' '.$user->getLastName().' to the database!');
                return $this->redirect($this->generateUrl('walkthrough_add_user'));
            }
        }

        return $this->render('kurtfunaiWalkthroughBundle:User:add.html.twig',
            array(
                'form' => $form->createView()
            ));
    }
}
Located In: WalkthroughBundle/Controller/UserController.php
View file on Github
######Lets break the addAction() down!
First, we instantiate a new User Entity and assign it to $user. Then we create our a form object, passing the Form\AddUser object, and our empty $user.
We then grab the $request object, and check if the form has been submitted. If it has not been submitted, it will render our page with an empty form.
If the form has been submitted, we bind the request to our form. This will place the details of the $request into our empty $user Entity that we passed earlier. Then, using the validation.yml rules we specified, we can use the isValid() function on our $form object.
If the data that was entered is not valid, the form is rendered with the appropriate error messages. If the $form->isValid() - it is time to add the user to our database!
We begin by grabbing our EntityManager, this will allow us to interact with our Entities (and Database).
You’ll notice that we can access functions on our User Entity to set any additional values. In this case: $user->setDateAdded(new \DateTime()); - we’re setting the $dateAdded on our $user with a new DateTime object.
Now that all our properties are set on our $user, let’s save it to the database.
$em->persist($user); Lets the EntityManager know that our $user Entity exists, and to pay attention to any changes made to it.
$em->flush(); Builds all of the queries and saves the information into the database.
When the $user has been successfully added to the database, we set a Flash session notice with a “Success!” message, and redirect the user back to the page with an empty form.


The View
——–
And finally, below is the Twig template file used to render our form.
<h1>Add User - Entities & Forms Walkthrough</h1>
<form action="{{ path('walkthrough_add_user') }}" method="post" {{ form_enctype(form) }} class="AddUserForm">
{{ form_errors(form.firstName) }}
{{ form_errors(form.lastName) }}
{{ form_errors(form.middleName) }}
{{ form_errors(form.group) }}
{{ form_errors(form) }}
{{ form_label(form.firstName, '*First Name:') }}
{{ form_widget(form.firstName) }}
{{ form_label(form.lastName, '*Last Name:') }}
{{ form_widget(form.lastName) }}
{{ form_label(form.middleName, 'Middle Name:') }}
{{ form_widget(form.middleName) }}
{{ form_label(form.group, '*Group:') }}
{{ form_widget(form.group, { 'attr': {'class': 'select_group'}, 'empty_value': '-- Add to Group --' }) }}
{{ form_rest(form) }}
<input type="submit" value="Add User!"/>
</form>Located In: WalkthroughBundle/Resources/views/User/add.html.twig
View file on Github
A few important things to note:
- Our action for the form points to the route for our
AddAction()on ourUserController. - You can render each part of a form element independently, and control their attributes.
form_label(form.firstName, '*First Name:')form_widget(form.firstName)form_errors(form.firstName)
- That we’ve added an empty value to our Groups select list. This value will evaluate as blank during validation.
- It is important to add
form_rest(form)at the bottom of the form, in order to render the hidden CSRF token field created by Symfony. CSRF protection is enabled by default to help prevent cross-site scripting, but can be disabled if you wish to do so.
That’s it - we’re finished!
—————————
Thanks for reading my walkthrough, I hope it was helpful. My goal with this was to provide some guidance to new Symfony2 users. If you’ve got any feedback or ways I can improve this method, I’d love to hear about it.